Cydia sources:
http://repo.benm.at/
http://cydia.hackulo.us/
http://repo.icausefx.com/
http://cydia.iclarified.com/
http://iphone.gsm.vn/
http://cydia.iphonecake.com/
http://apps.iphoneislam.com/
http://apt.macosmovil.com/
http://www.sinfuliphonerepo.com/
http://iphonedelivery.advinux.com/cydia/
http://cydia.xsellize.com/
http://gaurav.myrepospace.com/
http://cydia.ccp.li/
الخميس، 21 يوليو 2011
الاثنين، 18 أبريل 2011
برنامج لتقارير الرسائل لأجهزة الآي فون
برغم ان الأي-فون هاتف رائع وبرغم ان نظام تشغيل الجهاز يعتبر أفضل نظام تشغيل للأجهزة المحمولة, الا اننا نشعر احياناً ان شركة آبل تنسي ان الأي-فون في الدرجة الأولي هاتف, ومن اهم المميزات التي نفتقدها هي اشعار وصول رسالة نصية او (SMS Delivery Report)
الأن وأخيراً الخدمة التى انتظرناها كثيراً على الآي-فون , خدمة ال SMS Delivery Report متاحة للآي-فون عن طريق سيديا, شكراً للهاكرز (هاكرز لا تعني لص او سارق برامج وأنما مطور ايضاً ومن مهام الهاكرز إستخدام البرمجة العكسية لإضافة خواص جديدة للبرامج) قاموا بتفعيل هذه الخاصية في الهاتف ويمكنك الأن تحميلها عن طريق سيديا.
طريقة التثبيت: (البرنامج لا يعمل الا مع فيرموير 3 وما فوق)
أضف هذا السورس إلى سيديا.
http://iphonedelivery.advinux.fr/cydia/
قم بالبحث عن iPhoneDelivery ثم قم بتثبيته
اذهب إلى إعدادت ال SMS فى إعدادت الهاتف وقم بتفعيل خدمة ال Delivery Report ثم اقفل الهاتف وافتحه .
الآن عند إرسال أي رسالة ستستلم تقريرا بالوصول عند وصول الرسالة , التقرير يكون عبارة عن رسالة نصية .
, يمكنك تغيير التقرير إلى صيغة Flash DR بدلاً من الرسالة النصية إذا قمت بتفعيل Flash DR من اعدادت ال SMS
تمت التجربة على فودافون وموبينيل واتصالات مصر وموبايلي السعوديه بنجاح
الخميس، 14 أبريل 2011
طريقة فتح الآي فون لجميع شبكات الاتصال بدون جيلبريك
يعلم الجميع ان هناك هواتف أي فون مفتوحة على جميع الشبكات، وان هناك هواتف مغلقة على شبكة واحدة فقط، ايضاً نعلم انه بعد الفيرموير 4.0.2 لا يوجد فتح شبكة لهواتف الأي فون 4 و 3GS وبرنامج فتح الشبكة عن طريق الجيلبريك، UltraSn0w لا يعمل على فتح هواتف الأيفون على جميع الشبكات الا اذا كان البيس باند الخاص بجهازك لفيرموير 4.0.2 او اقل. ولذلك هناك الكثير لديهم هواتف أيفون لكن لا يستطيعون استخدامه في الاتصال لأنه مغلق على شبكة في امريكا مثلاً وهم في الوطن العربي وينتظرون اي أمل لفتح شبكة هواتفهم.
ولقد صرح موقع CutYourSim أنه قد استطاع فتح جهاز الآي فون 4, 3G, 3GS بطريقة كالرسمية ودون الحاجة لعمل جيلبريك للجهاز. وهو يعتبر فتح رسمي للآي فون كما تفعل آبل تماماً، ويبقى بشكل دائم في الجهاز. وهذا الفتح يمكنك من تشغيل الجهاز على أي شبكة وعمل تحديث له دون أي قيود مهما كانت نسخة البيس باند Baseband لديك ومهما كان الفيرموير المستخدم.
نعلم انه شيئ خيالي ويبدو كما يفعل مواقع النصابين، لكن تأكدنا انه حقيقي وفي المقابل هذا الحل لن يكون رخيصاً فهو يكلف $ 169 لكل جهاز.
يقول الموقع أن هذا التحديث لن يبطل الضمان المقدم من أبل على جهازك ببساطة لأنه يفك قفل الجهاز دون جيلبريك وكأن آبل هي من فعل الجهاز ليعمل رسمياً على كل الشبكات، وهناك بعض المواقع تصف هذه الطريقة بأنها تحدث من خلال وضع رقم الجهاز IMEI في القائمة المسموحة والتي تتحكم في فتح الشبكة أو اقفالها والموجودة في قاعدة بيانات شركة أبل، ولا يعتقد أن ذلك يحدث عن طريق القرصنة. وليس هناك تفاصيل دقيقة كيف يتم ذلك حتى الآن.
كما نعلم أن بعض شركات الاتصالات تستطيع فتح شبكة الأي فون بشكل رسمي على جميع الشبكات وتلك صلاحية منحتها لها أبل، وهو مانعتقد أنها هي الطريقة المستخدمة هنا. وشركة أبل تستطيع أن تكتشف الأجهزة التي عمل ذلك لها وتستطيع تقييدها مستقبلاً أيضاً في اول تحديث. لذلك ننصحك اذا قمت بشراء قتح الشبكة هذا ان تتريث قليلاً قبل الترقية
ولقد علق MuscleNerd من DevTeam الفريق المسؤول عن الجيلبريك والذي ينتج اداة UltraS0w لفتح قفل الشبكة عن طريق الجيلبريك، ذكر على صفحة التويتر الخاصة به هذه الكلمات:
“اذا اردت تجربة ذلك. إفعل ذلك بسبب اجتهادهم لتقديم خاصية مثل هذه وبشكل جيد”
“لهذا السبب، كل من يستخدم هذه الخاصية عليه أن يأخذ الحذر عند عمل تحديث أو ريستور للجهاز”
“إنه في قدرة أبل إبطال هذا الفتح وذلك بمجرد عمل ريستور”
“الآي فون مختلف عن جميع أجهزة الهواتف الأخرى، لأن كل مرة تقوم فيها بعمل ريستور فإنه يجب أن يحصل على رمز توثيقي لفتح الجهاز”
“هذه الجزئية تتضح جلياً بأنها غير مشروعة، وأنا أعتقد أن هذا السعر الغالي للفتح بسبب المخاطرة القانونية التي يقدم عليها هؤلاء”
“إنهم لايستخدمون القرصنة، ولكنهم يلجون الى قاعدة بيانات أبل”
وأخيراً، لايمكننا أن ننكر أن CutYourSim استطاعت فتح الأجهزة بشكل حقيقي دون جيلبريك، ولكننا نتسائل هل أبل ستغض الطرف عن ذلك؟ لكن رأي الشخصي ان كل من معه جهاز مغلق ولا يستطيع استخدامه كهاتف تقدم واذهب الى موقع CutYourSim وقم بطلب فتح جهازك رسمياً، هذا أفضل من ان لا تستخدم جهازك كهاتف وربما تنتظر الى الأبد فريق ديف تيم حتي يقدم لك حل مجاني.
اما اذا كنت تعتقد ان مبلغ 170$ كثير او انك متشكك في مستقبل الطريقة السابقة وتود حل اخر وهناك طريقة أخرى لفتح أجهزة الآي فون 4 فقط، وبدون عمل جيلبريك أيضاً للجهاز وهي تتوافق مع الإصدارات التالية iOS 4.0, 4.1, 4.2.1, 4.3, 4.3.1، وتعمل على البيس باند Baseband 1.59, 2.10, 3.10.1, 4.10, 4.10.1، وأيضاً لن تفقدك الضمان على الجهاز.
وهذه الطريقة مقدمة من شركة applenberry وهي تتم من خلال إدخال الشريحة في المدخل مع رقاقة إلكترونية من صنع الشركة، ويجب عمل ريستور للجهاز على ضبط المصنع ودون تغيير أية خصائص وذلك لتعمل معك. وهذا الحل سيكلفك 65$ لشراء هذه الرقاقة وهي ستعمل جيداً على GPRS / EDGE ولكن قد لا تعمل على بعض الشبكات في خاصية ال 3G وطبعاً لها بعض مشاكل ال TurboSim المعروفة مثل فقد الشبكة احياناً.
الجمعة، 8 أبريل 2011
الجيلبريك لآخر إصدار 4.3.1 للآيفون، الآيباد، الآيبود
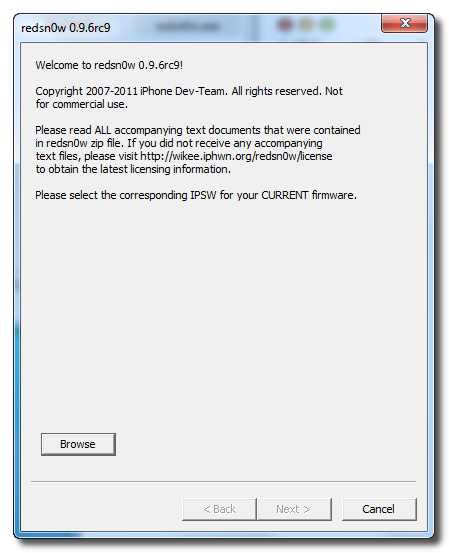
نجح فريق ديف تيم في تحديث برنامج Redsn0w ليقوم بعمل جيلبريك غير مقيد للإصدار الاخير 4.3.1، طبعاً هذا خبر رائع لجميع محبين الجيلبريك.
قبل عمل جيلبريك:
- يجب ان يكون جهازك على أخر إصدار 4.3.1
- هذا الجيلبريك لا يعمل مع الآي باد 2
- يجب ان يكون لديك ملف الفيرموير محفوظ على جهازك
خطوات الجيلبريك
- افتح برنامج RedSn0w ثم اضغط على زر Browse
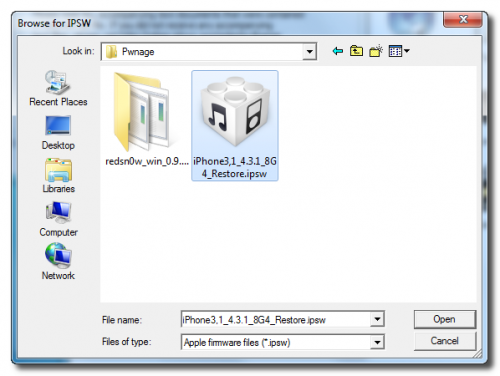
- حدد مكان الفيرموير للإصدار 4.3.1 الذي يحمل الامتداد ipsw ثم اضغط زر Open
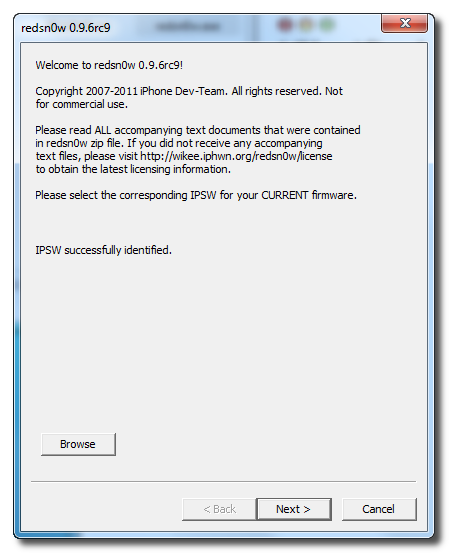
- سيتم الان التحقق من الفيرموير اضغط زر Next للمتابعة
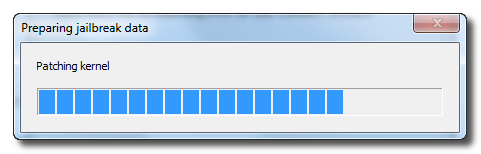
- سوف يتم اعداد الجلبريك الان فقط انتظر
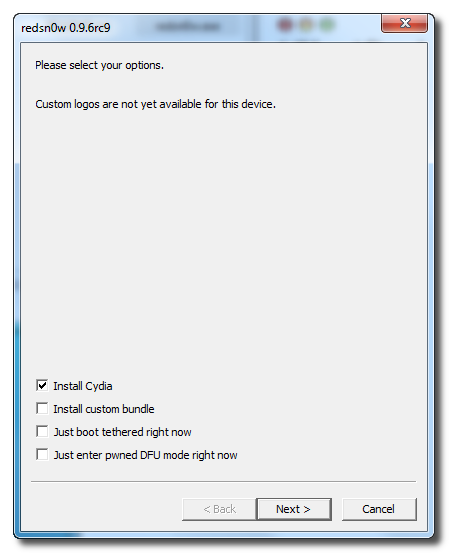
- ستظهر نافذة من خلالها يمكنك تحديد الخيارات فقط اختار تثبيت برنامج سيديا ثم اضغط زر Next للمتابعة
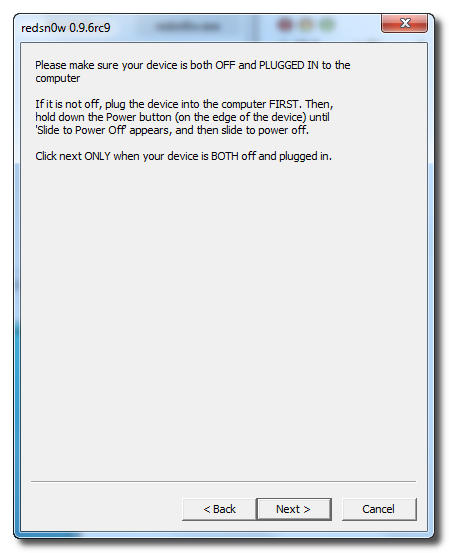
- الان اغلق جهاز ثم قم بايصاله إلى جهاز الكمبيوتر وتأكد من انه مغلق قبل الضغط زر Next للمتابعة
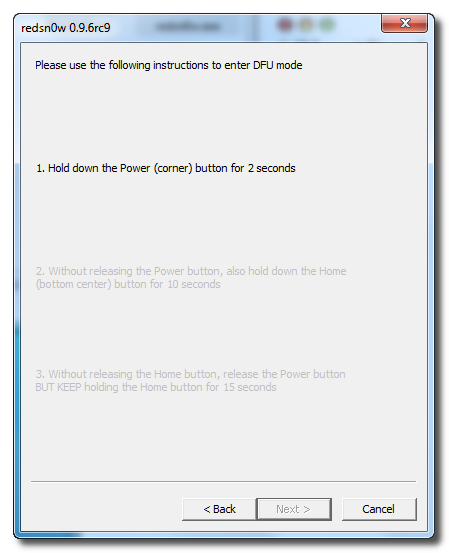
- والآن يرنامج RedSn0w سوف يكتب لك خطوات الدخول في وضع DFU. اتبعها بحرص
- الضغط على زر التشغيل لمدة ثانيتين.
- الاستمرار بالضغط على زر التشغيل مع الضغط على زر الهوم لمدة عشر ثواني
- ترك الضغط على زر التشغيل والاستمرار بالضغط على زر الهوم لمدة خمسة عشر ثانية
- اضغط زر Next للمتابعة والان سوف يتم عمل جيلبريك لجهازك
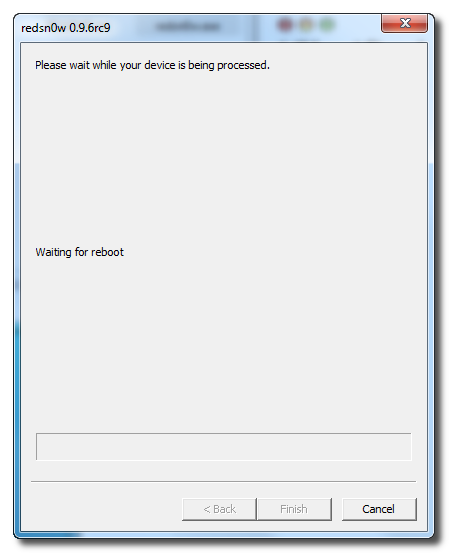
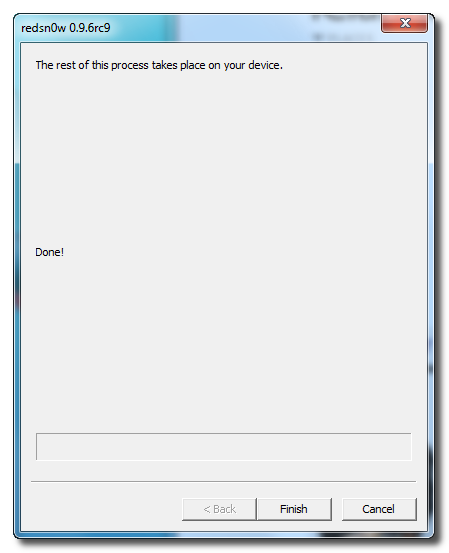
- فور الانتهاء من الجيلبريك سوف يتم إعلامك حينها اضغط على زر إنهاء. سوف يقوم الجهاز تلقائياً باعادة تشغيل نفسه بعد (5 دقائق أو نحو ذلك) وبعدها سترى ايقونة سيديا على جهازك
شكرا لفريق ديف تيم وشكراً لمكتشف الثغرة الهاكر الالماني i0n1c
مصدر الصور: iclarified
معلومات هامة:
- لا تقم بالترقية الى الفيرموير 4.3.1 ان لم يكن هاتفك مفتوح على كل الشبكات
- الجيلبريك لا يدعم فتح الشبكة ولا ننصحك بالترقية الى اخر اصدار وحتي تستخدم برنامج UltraSn0w لفتح الشبكة عليك انتظار أداة ديف تيم التي سوف تتيح ذلك
- بعض برامج الجيلبريك غير متوافقة مع الإصدار 4.3.1
- Celeste
- Infinidock
- Backgrounder
- Shrink
- Action Menu
تحذير:
- قم بعمل الجيلبريك على مسؤليتك لا نستطيع ان نساعدك في شيئ، ولم اقم شخصياً بعمل جيل بريك، على الاقل ليس على هاتفي الشخصي.
- لن اقول لك الجيلبريك ضار بالصحة، لكن اقول لك عن خبرة جهازك افضل بكثير بدون جيلبريك الا اذا كنت ترى ضرورة للجيلبريك.
المصدر: http://www.iphoneislam.com/?p=9705#ixzz1IvbqTxww
الجمعة، 11 مارس 2011
الإصدار الجديد من أبل 4.3
برغم اعلان آبل سابقاً ان الإصدار 4.3 من نظام تشغيل iOS سوف يكون متاح للجميع بدأ من يوم 11 مارس الا ان آبل قامت بالتبكير واتاحة الإصدار الجديد اليوم. ويشمل التحديث اجهزة الآي فون والآي بود تاتش والآي باد والذي سيحمل اصداره ايضاً الرقم 4.3 وكذلك التحديث يشمل الآبل تي في، وللمرة الاولى سيوحد كافة اصدارات اجهزة آبل الذي تحمل هذا النظام تحت رقم واحد وفي ظل عائلة واحدة مع مراعاة لاختلاف بعض الميزات بين الاجهزة الأربع.
سنقدم لكم اليوم دليلا كاملا للتحديث الى هذا الاصدار كما تعودتم منا سابقاً بحيث يعد كمرجع اساسي لك ومساعد في انجاح خطوات عملية التحديث الى نهايتها.
محتويات الدليل:
اهم ميزات التحديث رقم 4.3
الاجهزة التي ينطبق عليها هذا التحديث
ملاحظات اساسية قبل التحديث
خطوات اساسية قبل التحديث
الفرق بين ال Update وال Restore
خطوات التحديث التلقائي
خطوات التحديث اليدوي
- اهم ميزات التحديث رقم 4.3 :
1. تحسينات في تقنية الأير بلاي (AirPlay) ولمن لا يعرف ما هذه التقنية نقول له ببساطة ان الأير بلاي هو نقل المحتوى لاسلكياً من جهازك الى جهاز اخر يدعم الأير بلاي مثل آبل تي في (وللمزيد اقرأ هذا المقال)، وهذه التحسينات تتمثل في جعل مطورين البرامج القدرة على الاستفادة من هذه التقنية واضافتها الى برامجهم.
2. اضافة محرك جافا (Nitro JavaScript) لبرنامج تصفح الأنترنت السفاري والان من المفروض ان يكون المتصفح أسرع مرتان في التصفح من النسخ السابقة.
3. إضافة خاصية (iTunes Home Sharing) وهذه الخاصية تمكنك من مشاركة الوسائط لاسلكياً مع برنامج أيتيونز، مثلاً لو كان عندك في غرفة جهاز ويندوز وعليه برنامج أيتيونز وعليه اناشيدك وافلامك سوف يمكنك عرض او سماع اي شيئ على جهازك لاسلكياً في اي مكان في المنزل على الأي فون او الأي باد او حتى جهاز شخصي في مكان اخر به برنامج أيتيونز، لكن بالطبع يجب ان يكون الجميع تحت شبكة واحدة.
4. اعطاء القدرة للتحكم في مهمة الزر الجانبي للأيباد لجعله اما للصامت او لتثبيت دوران شاشة الجهاز.
5. خاصية جعل هاتفك (HotSpot) لمشاركة الأنترنت ولكن هذه الخاصية تعمل فقط مع اجهزة الأي فون 4 وتمكنك من جعل هاتفك هوت سبوت وهذا طبعاً مختلف عن مشاركة الأنترنت التي كانت في الاصدارات السابقة فهذه الخاصية تتيح لك مد خمس اجهزة بالانترنت من خلال هاتفك ويمكنهم استقبال الأنترنت عن طريق الواي فاي وان كنت تذكر ان مشاركة الانترنت في الاصدارات السابقة كانت مقتصرة على البلوتوث وايصال الجهاز عن طريق الUSB، لكن الان يمكن ان تغذي كل اجهزة بيتك بالانترنت عن طريق جهازك الأي فون 4
- الأجهزة التي ينطبق عليها التحديث:
ينطبق هذا التحديث على الآي-فون 4 وعلى الآي-فون 3GS لكن سقطت هواتف 3G وكان اخر تحديث له هو 4.2.1 والان هواتف 3G لن يتم اصدار تحديث له كما ذكرنا من قبل. وينطبق هذا التحديث على الآي-بود تاتش من الجيل الثالث ومابعده لكن الجيل الثاني ايضاً اخر تحديث له هو 4.2.1 ولن يتم اصدار تحديث له بعد ذلك. وكذلك يصلح على الآي-باد الجيل الأول والثاني. وبالطبع لن ينطبق هذا التحديث على الآي-فون 2G وعلى الاى-بود تتش الجيل الأول.
- ملاحظات اساسية قبل التحديث:
قبل ان تقوم باتخاذ قرار التحديث يجب عليك اخذ النقاط التالية بالحسبان والتي قد تدفعك لتاجيل هذا التحديث وهي:
الانتظار لعدة ايام لرؤية تاثير هذا التحديث على من قام به والتاكد من المشاكل والتاثيرات الجانبية له وهذه خطوة اختيارية.
اذا كان جهازك مقفول على شبكة معينة واستخدمت جيل بريك وبرنامج لفك هذا القفل فلا تقم بتاتا بالتحديث قبل اصدار جيل بريك جديد وبرنامج جديد لفك القفل، حيث لن هذا التحديث سيؤدي الى اغلاق جهازك.
اذا كنت تستخدم جيل بريك ولا ترغب بفقدانه وفقدان ميزاته وتطبيقاته فلا تقم بالتحديث قبل اصدار جيل بريك جديد، حيث ستفقد الوصول لتلك التطبيقات التي قمت بتحميلها من متجر السيديا واي خصائص واعدادات اخرى متعلقة بهدا الجيل بريك.
-خطوات اساسية قبل التحديث:
قبل ان تقوم بربط الآي فون بجهاز الكمبيوتر وتحميل التحديث وتثبيته يجب عليك اتخاذ الخطوات التالية:
1- تحديث الآي تيونز iTunes في جهاز الكمبيوتر الخاص بك الى آخر اصدار وهو الاصدار رقم 10.2.1 ويمكنك القيام بذلك كالتالي:
لاصحاب اجهزة الماك: من القائمة الرئيسية لآبل – تحديث البرامج Apple menu > Software Update
ولاصحاب اجهزة الويندوز: من قائمة المساعدة في الاي تيونز – تحديث البرامج Help > Software Update
ويمكنك أيضا تحميل الآي تيونز آخر إصدار يدويا من موقع آبل وتثبيته من هنا
2- تحديث جميع تطبيقات الآي فون: وذلك للتاكد من انها متوافقة مع الاصدارة رقم 4.0 من خلال زيارة تطبيق متجر البرامج App Store في الآي فون حيث ستظهر على ايقونته علامة Badge بعدد التطبيقات غير المحدثة ومن ثم تشغيله والذهاب الى تبويب “تحديثات” او “Updates” والضغط على زر “Update All” او تحديث جميع التطبيقات.
3- النسخ الاحتياطي: عملية الترقية الى نظام او تحديث جديد في الآي فون تسبب بطبيعة الحال بمسح البيانات على الآي فون آو الآي بود تتش بشكل كامل لذا لا بد من النسخ الاحتياطي للبيانات وهذه العملية تتم بشكل تلقائي في كل مرة تجري فيها عملية مزامنة بين الآي فون والجهاز عند ربطه بحيث يتم حفظها بالجهاز، ولكن يمكنك التأكد والإطمئنان بشكل اكبر باجراء عملية نسخ احتياطي من خلال الآي تيونز من خلال زر Back Up (من القائمة اليسرى اضغط على صورة الآي فون مع زر كنترول Ctrl واختر Back Up) ومن ثم يمكن استعادة هذه النسخة بعد ذلك بواسطة زر Restore من الآي تيونز ايضا.
4- نسخ الخصائص والملاحظات: يمكن من خلال هذه الخطوة الاختيارية ان تحفظ بعض الخصائص الخاصة بالآي فون خاصتك والموجودة تطبيق الاعدادات وذلك بأخذ لقطات مصورة للشاشة سكرين شوت والاحتفاظ بها والعودة لها عند الضرورة (يمكن اخذ سكرين شوت للشاشة بضغط زر الهوم مع زر التشغيل بالوقت نفسه).
يمكنك كذلك ان كان تطبيق المفكرة او الملاحظات يحتوي على نصوص هامة لك ان تقوم بارسالها عبر الايميل للتاكد من انها لن تضيع ابدا (رغم انها تحفظ عادة من خلال المزامنة).
- الفرق بين ال Restore و ال Update :
قبل ان نبدأ بالتحديث لا بد من اعطاء نبذة عن الفرق بين عمليتي ال Restore وال Update وتاثيرهما الفعلي على الآي فون.
حينما تقوم بربط الآي فون بجهاز الكمبيوتر سيعمل الآي تيونز تلقائيا وسيقوم بعملية المزامنة ثم ان توفر تحديث جديد من آبل وكان الآي فون يعمل على تحديث قديم سيظهر لك رسالة تطالبك بالتحديث وعند الموافقة سيتم تنزيل التحديث الجديد على جهازك ومن ثم ستجري عملية تحديث الآي فون.
العملية السابقة تسمى ال Update
أما ال Restore فاستخدامه يكون بالتحديث اليدوي كما سنرى بعد قليل- او لاستعادة نسخة احتياطية سابقة قمت بها على الآي تيونز.
- التحديث التلقائي:
بعد التاكد من قيامك بالخطوات السابقة يمكنك البدء بعملية التحديث التلقائي من خلال ربط جهاز الآي فون بالكمبيوتر وتشغيل الآي تيونز لتظهر بعد ذلك رسالة تخيرك بين التحميل والتثبيت او التحميل فقط، اذا اخترت الاولى ستظهر الرسالة التالية:
عملية التنزيل والتحديث ستأخذ بعض الوقت (يبلغ حجم التحديث حوالي 670 ميجا بايت) ومن ثم ستحتاج الى اعادة تفعيل الآي فون اون لاين من خلال الشبكة.
بعد انتهاء التحديث قم بتصفح الآي فون وتوجه الى الخصائص وتاكد من انها مضبوطة بشكل صحيح وبالتحديد خصائص حسابات الإيميل والتقاويم وذلك من خلال تطبيق الاعدادات- الايميل، جهات الاتصال، التقاويم Settings > Mail, Contacts, Calendars وتأكد ان جميع حساباتك موجودة.
- التحديث اليدوي:
يمكنك القيام بالتحديث اليدوي من خلال تنزيل ملف التحديث من خلال الروابط التالية بحسب نوع جهازك كما هو مبين:
iPhone 4
iPad 1
iPhone 3GS
iPod 4G
iPod 3G
iPod 2G
بعد ذلك وبعد اتمام التحميل قم بربط جهازك بالكمبيوتر ثم توجه الى الاي تيونز واضغط على زر Restore مع زر Options في الماك او زر Restore مع شيفت Shift بالنسبة لنظام وكيبورد ويندوز. (تأكد ان امتداد الملف IPSW وان كان غير ذلك فقط قم بتغير الأمتداد بشكل يدوي الي IPSW) ستظهر لك نافذة لتختار منها الملف الذي تم تحميله ولتبدأ بعد ذلك عملية التحديث للآي فون.
- مابعد التحديث:
تطبيق الخطوات السابقة سيضمن لك نجاح التحديث باذن الله، ويجب ملاحظة ان اول عملية مزامنة بين الآي فون والجهاز بين انتهاء عملية التحديث ستاخذ وقتا يقدر بربع ساعة او أكثر حيث سيتم نقل البيانات المخزنة في جهازك الى الآي فون، وعند انتهائها ستلاحظ انه حتى صفحات السفاري في الآي فون المفتوحة مسبقا قبل التحديث تبقى كما هي وكذلك البيانات والخصائص الأخرى. حينها يمكن القول ان عملية التحديث قد تمت بنجاح.
ملاحظة: الجيلبريك الحالي لا يصلح لهذا الإصدار ولا نعلم وقت صدور الجيلبريك الجديد وحين صدوره سوف نعلن في الموقع.
الأربعاء، 9 مارس 2011
How to Create your First iPhone Application كيف تنشأ برنامج آيفون
How to Create Your First iPhone Application
What if you had a nickle for every time you heard: "I have the perfect idea for a great application!"? It’s the buzz on the street. The iPhone has created unprecedented excitement and innovation from people both inside and outside the software development community. Still for those outside the development world, the process is a bit of a mystery.
This how-to guide is supposed to walk you through the steps to make your idea for an iPhone app a reality. This post presents various ideas, techniques, tips, and resources that may come in handy if you are planning on creating your first iPhone application.
1. Have an idea – a Good Idea
How do you know if your idea is a good one? The first step is to even care if your idea is solid; and the second step is to answer the question does it have at least one of the indicators of success?
Does your app solve a unique problem? Before the light bulb was invented, somebody had to shout out “Man, reading by candlelight sucks!” Figure out what sucks, and how your app can make the life of its user more comfortable. | |
Does the app serve a specific niche? Though there aren’t any stats on the App Store search, the usage of applications is certainly growing with the explosion of App Store inventory. Find a niche with ardent fans (pet lovers, for example) and create an app that caters to a specific audience. | |
Does it make people laugh? This is a no-brainer. If you can come up with something funny, you are definitely on the right track and your idea may be the golden one. Heck, I hit a red “do not press” button for 5 minutes yesterday. | |
Are you building a better wheel? Are there existing successful apps that lack significant feature enhancements? Don’t be satisfied with just a wine list, give sommeliers a way to talk to their fans! | |
Will the app be highly interactive? Let’s face it, most of us have the attention span of a flea. Successful games and utilities engage the user by requiring action! |
Action: Does your app fall in to one of these categories? If yes, it’s just about time to prepare the necessary tools.
2. Tools Checklist
Below is a list of items you’ll need (*starred items are required, the rest are nice-to-have’s):
- join the Apple iPhone Developer Program ($99) *
- get iPhone or iPod Touch *
- get an Intel-based Mac computer with Mac OS X 10.5.5,
- prepare a Non-Disclosure Agreement (here’s a sample) *
- download and install the latest version of the iPhone SDK if you don’t already have it.
- a spiral bound notebook*
Action: Load up on your required supplies.
3. What Are You Really Good At?
What skills do you bring to the table? Are you a designer whose brain objects to Objective C? A developer who can’t design their way out of a paper sack? Or maybe you are neither, but an individual with an idea you’d like to take to the market? Designing a successful iPhone application is a lot like starting a small business. You play the role of Researcher, Project Manager, Accountant, Information Architect, Designer, Developer, Marketer and Advertiser – all rolled into one.
Remember what all good entrepreneurs know – it takes a team to make a product successful. Don’t get me wrong, you certainly can do it all. But you can also waste a lot of time, energy and sanity in the process. Don’t go crazy, reference the checklist below and ask yourself: What roles are the best fit for you to lead? Then find other talented people to fill in the gaps. The infusion of additional ideas can only enrich the product!
Skills Checklist
- Ability to Discern what works/doesn’t work in existing iPhone Apps
- Market research
- Outlining App Functionality (Sitemap Creation)
- Sketching
- GUI Design
- Programming (Objective C, Cocoa) (we assume here that we are creating a native application)
- App Promotion and Marketing
Remember to have contractors sign your non-disclosure agreement. Having a contract in place tells your contractor "I’m a professional that takes my business and this project seriously. Now don’t go runnin’ off with this idea."
Action: Select skills that are a good fit for you to lead. For those roles where you cannot lead, hire professionals.
4. Do Your Homework: Market Research
Market research is a fancy way of saying "Look at what other people are doing and don’t make the same mistakes." Learn from the good, bad and ugly in the App Store. Coming up with creative solutions in the app concept development and design starts with analyzing other (maybe similar) applications. Even if you encounter a lot of poorly designed apps, your mind will reference these examples of what not to do.
Action: Answer these questions:
- What problem does your app solve?
- What products have you seen that perform a similar task?
- How do successful apps present information to users?
- How can you build on what works and make it unique?
- What value does your app bring to your audience?
5. Know the iPhone/iPod Touch UI
If you want to create an iPhone app, you need to understand the capabilities of the iPhone and its interface. Can you shoot a .45 caliber bullet out of your iPhone? No. Can you shoot videos? Yes!
The good news is that you don’t have to memorize the encyclopedic Apple User Interface Guidelines to get a feel for what works and what doesn’t in iPhone Apps. Download and play with as many apps as you can, and think about what functionality you want to include in your product.
Take note of:
- How do well-designed apps navigate from screen to screen?
- How do they organize information?
- How MUCH information do they present to the user?
- How do they take advantage of the iPhone’s unique characteristics: the accelerometer, swiping features, pinch, expand and rotate functions?
Action: Download the Top 10 apps in every category and play with all of them. Review the Apple Guidelines for UI design and list at least 5 features you’d like to incorporate into your app.
6. Determine "Who will use your app?"
We assume here that you’ve already determined that your app will bring value and that you will have a raging audience for your app. Well, fine, they are raging fans, but who are they really? What actions will they take to achieve their goals within the app?
If it’s a game, maybe they want to beat their high score. Or perhaps they are a first time player – how will their experience differ from someone who is getting a nice case of brain-rot playing your game all day?
If it’s a utility app, and your audience wants to find a coffee shop quickly, what actions will they take within the app to find that coffee shop? Where are they when they’re looking for coffee? Usually in the car! Do present an interface that requires multiple taps, reading and referencing a lot? Probably not! This is how thinking about how real-life intersects design.
Action: Line item out the different types of people who will use your app. You can even name them if you want to make the scenarios you draw out as real as possible.
7. Sketch Out Your Idea
And by "sketch" I mean literally sketch. Line out a 9-rectangle grid on an 8.5 x 11 sheet of paper and get to sketching!
Ask yourself:
- What information does each screen need to present?
- How can we take the user from point A to point B to point C?
- How should elements on the screen be proportioned or sized in relation to each other (i.e. is this thing even tap-able?)
Thumb-nailing your ideas on paper can push your creativity far beyond where your imagination might stagnate working in an sketching application! You can also buy the iPhone Stencil Kit to quickly sketch out iPhone UI prototypes on paper.
Action: Create at least one thumbnail page of your application per screen. Experiment with various navigational schemes, the text you put on buttons, and how screens connect. If you want to transfer your sketches into digital format, iPlotz is a good tool to check out.
8. Time for Design
If you are a designer, download the iPhone GUI Photoshop template or our iPhone PSD Vector Kit. Both are collections of iPhone GUI elements that will save you a lot of time in getting started. If you’ve solidified your layout during sketching, drawing up the screens will be less of a layout exercise and more about the actual design of the app.
If you are not a designer, hire one! It’s like hiring an electrician to do electrical work. You can go to Home Depot and buy tools to try it yourself, but who wants to risk getting zapped? If you’ve followed steps 1–3, you’ll have everything you need for a designer to get started.
When looking for a designer, try to find someone who has experience designing for mobile devices. They may have some good feedback and suggested improvements for your sketches. A few places to look for designers: Coroflot, Crowdspring, eLance. When posting your job offer, be very specific about your requirements, and also be ready to review a lot of portfolios.
Action: If you are a designer, get started in Photoshop. If you are not a designer, start interviewing designers for your job.
9. Programming
Even though this how-to is sequential, it’s a good idea to get a developer on board at the same time when you line up design resources. Talking with a developer sooner than later will help you scope out a project that is technically feasible and within your budget.
If you are a Objective C/Cocoa developer crack, open Xcode and get started! A few forums to join if you haven’t already:
- Apple Dev Forum
- iPhoneSDK (moderated by Erica Sadun)
- iPhoneSDKForum
- iPhoneDev Forums
- iPhoneSB
If you are not a developer, you know what to do – find one! Specify the type of app you want to produce – whether it is a game, utility or anything else. Each type usually requires a different coding skill set. A few places to look for developers: Odesk, iPhoneFreelancer, eLance and any of the forums listed above.
10. Submit your application to Apple Store
OK, so how do you submit your application to Apple Store now? The process of compiling your application and publishing the binary for iTunes Connect can be difficult for anyone unfamiliar with XCode. If you are working with a developer, ask them to help you:
- Create your Certificates
- Define your App ID’s
- Create your Distribution Provisioning Profile
- Compile the application
- Upload to iTunes Connect
Action: If you are a developer, map out a development timeline and get started. If you are not a developer, start interviewing devs for your job.
11. Promote Your App
If a tree falls in the middle of the woods and nobody was around to hear it does it make a sound? Apps can sit in the store unnoticed very easily. Don’t let this happen to you. Be ready with a plan to market your app. In fact, be ready with many plans to market your app. Be ready to experiment, some ideas will work, others won’t.
Strategies for maintaining/boosting app sales:
- Incorporating social media. If your users make the high score on his or her favorite game, it is a good idea to make it easy for the user to post it to Facebook or Twitter. Think about how your app can incorporate social media and build that functionality into your app. At a minimum, set up a fan page for your app on Facebook and Twitter and use them as platforms to communicate with your users and get feedback on your app.
- Pre-launch promotion. Start building buzz about your app before it has launched. E-mail people who write about things that relate to your app and see if they will talk up the upcoming release of your app.
- Plan for multiple releases. Don’t pack your app with every single feature you want to offer in the very first release. Make your dream list for the app and make sure that the app is designed to incorporate all of the features at some time in the future. Then periodically drop new versions of the app to boost app store sales.
Action: Make a list of 20 promotional strategies that target the audience for your app. Take action on them yourself or hire someone who can!
11. Stay Focused and Don’t Give Up!
It’s easy when you are working on your first app to get all AppHappy, dreaming up a zillion new app-ideas. Dream, but don’t get sidetracked by new ideas. Your first app needs to make a big splash and getting involved in too many projects at once can dilute your passion for making your first application a success.
Action: Get out there and go kick some app!
الجمعة، 25 فبراير 2011
iPhone Errors
Issue 1601 or 1602:
When trying to restore your iPhone in iTunes, you may see the following message followed by an error code 1601 or 1602:
The iPhone could not be restored. An unknown error occurred.
Or when trying to restore your iPod touch in iTunes, you may see the following message:
The iPod "[username]" could not be restored. An unknown error occurred (1602)
Solution
Completely remove iTunes and Apple Mobile Device support and then reinstall iTunes . Click the appropriate link below for instructions on how to accomplish this for your operating system.
Error 20
Error when downgrading
هذا العطل يظهر بسبب محاولة العميل عمل
downgrading
Error 21
Custom firmware restore fail (PwnageTool since 4.1). You have to put your device into the DFU mode and not into recovery mode. Device won't boot correctly an stuck at the Apple logo after the error. Press and hold power and home button until it reboots.
Error 21
Custom firmware restore fail (PwnageTool since 4.1). You have to put your device into the DFU mode and not into recovery mode. Device won't boot correctly an stuck at the Apple logo after the error. Press and hold power and home button until it reboots.
هذا العطل يظهر للعميل عندما يقوم بعمل الجيل بريك ولكن لم يكتمل
Error 23
Cannot restore or update due to hardware problems.
• In software you have to set default web browser.
• In hardware, it's a communication problem. Check all connections, also try to change battery.
• faulty baseband flash or processor
• Happens frequently after water damage. Remove and clean motherboard.
Error 26
False version of the NOR flash firmware. Use the correct sn0wbreeze version.
Error 28
Hardware error. Return your device to Apple if possible. The problem is a bad dock connector on the iPhone. Must change the connector.
Error 29
See Apple discussions thread about this problem. You might need to change the battery.
Error 34
Hard disk is run out of space when trying to download TV show's or movie's Please clear space and then continue downloading.
Error 1002
Error when restoring.
يحدث في بعض الحالات بسبب عطل البطاريه حيث ان الجهاز لايستطيع عمل بوت باستخدام الطاقه من البطاريه
Error 1004
This is caused by a failure to match the Baseband Nonce currently in memory to the nonce returned in the Baseband Firmware SHSH blob. This happens if you edited the hosts file (Saurik's Server) or you are using TinyUmbrella. Use TinyUmbrella and "Kick Device Out Of Recovery" to boot.
Error 1011
This is caused by recovery mode being in (4.2.1 firmware). The file iTunesMobileDevice.dll is damaged or updated.
Error 1013
iPhone 4
This means that the baseband did not get updated. Either remove the gs.apple.com entry from your hosts file and let the baseband upgrade or if you want to preserve the baseband just jailbreak at this point to boot it up.
Other Devices
Restart computer; change computer; reinstall system, if iPhone is always in restoring mode: XP users can jump from restoring mode with ibus; MAC users can use iNdependence. (usually on the iPhone with downgraded
Error 1014
This occurs when you try to downgrade your phone's baseband.
Error 1015
This error is common when downgrading iPhones and 3G-enabled iPads. The problem occurs when the device's baseband has a higher version number than the baseband in the firmware you restored to. Just set auto-boot true in iRecovery or use iREB/TinyUmbrella/RecBoot.
Error 1394
When Spirit2Pwn flashes parts of the boot chain on iOS 4, the device may crash into DFU(Device Firmware Upgrade) Mode. [1]
Error 1413
Restart computer; change USB port; reinstall system.
Error 1415
Restart computer; change USB port; reinstall system.
Error 1417
Restart computer; change USB port; reinstall system.
Error 1418
Restart computer; change USB port; reinstall system.
Error 1428
Restart computer; change USB port; reinstall system.
Error 1050
Bad response from gs.apple.com OR need iReb for preparing iPhone for restoring to custom ipsw
Error 1600
Custom firmware can't be restored on a device with DFU Mode. The software of the iPhone isn't patched. Go into Recovery Mode (Pwnage Tool up to 4.0.1) or start Pwnage Tool and click "DFU" at the top and go with this tutorial into the DFU mode. During that process the software gets patched and the custom firmware should run without any problems.
Error 1611
iTunes tried to enter the Restore Mode, but the device turned back to the Recovery Mode.
Error 1618
Missing system files or corrupt data in iTunes installation. Try to uninstall iTunes, restart computer, install again.
Error 1619
iTunes is too old and couldn't read the iPhone in Recovery or DFU Mode. Please update iTunes and try it again.
Error 1644
IPSW was moved during prepare with iTunes. Try it again and don't move the IPSW.
Error 2001
The Mac OS X kernel extension "IOUSBFamily" that was bundled with late 2008 / early 2009 MacBooks, as well as the 10.5.6 update, has a bug where it fails to properly recognize an iDevice in DFU Mode. It can be resolved by updating to 10.5.7 (or later), or using a USB hub.
Also if you have Limera1n opened during you try to restore the iOS device.
Error 2002
iTunes can't connect because another program is using it or it's disconnected during the Apple Server check.
Error 2003
Connection problem; change USB cable and check USB port.
Error 2005
Problem connecting. Probably a hardware failure.
Error 3002
• Update to an older firmware isn't working, because Apple is no longer handing out SHSHs for the device/firmware combination.
• Or a timeout checking Apple server - retry later.
• This error also happens if you try to Update with a local TSS server (TinyUmbrella tool) and probably also when connecting to Cydia Server. Use Restore instead.
Error 3004
No internet connection during the firmware restore. iTunes can't connect to gs.apple.com. Maybe Port 80 and Port 443 is blocked. Open it on your router.
Error 3014
False edited hosts. The SHSH request couldn't be completed. No connection to the Apple Server, Sauriks Server or localhost. iTunes can't connect to gs.apple.com. Maybe Port 80 and Port 443 is blocked. Open it on your router.
Error 3123
Something dealing with movie rentals.
Error 3191
QuickTime corrupted must reinstall before iTunes will work or Turn off Compatibility Mode for QuickTime.
1. Right-click on the QuickTimePlayer application (located in C:Program FilesQuickTime) and choose Properties from the shortcut menu.
2. In the Properties window, click on the Compatibility tab Deselect the checkbox labeled “Run this program in compatibility mode for.”
3. Click Apply.
4. Close the Properties window
Error 3194
Occurs when trying to install an old firmware and Apple's server disallows the installation. The only solution is to have SHSH backup and modify the hosts file to point to Saurik's Cydia Server where they are backed up (or localhost if you have it yourself).
Error 3195
"An internal error occurred." Missing SHSH for the firmware. Maybe the same as "This device isn't eligible for the request build." but with an cache error.
Higher Errors
Error 11222
A security software you have installed may be conflicting with iTunes.
Error 20000
Is caused by a custom theme pack on your Windows. Use default Theme.
This error can also be caused by the iDevice rebooting during the "Extracting Firmware" stage of restore.
Error 20008
This happened on a Mac with TinyUmbrella running before resotring a firmware to the Apple TV.
Hex codes
0xE800001
Device was suddenly unplugged. iTunes couldn't connect with the device. Try it again
0xE8000022
Error in your firmware files. Restore.
0xE800003D
False permissions in the Carrier Bundle folder. Restore, update or fix the permissions from the carrier bundle to update the carrier settings via iTunes.
0xE800006B
Device was suddenly unplugged. iTunes couldn't connect with the device. Try it again.
0xE8000065
sn0wbreeze custom firmware error on USB connection. Unplug the device, reboot it, and plug it in again.
0xE8008001
You are trying to install unsigned (cracked?) apps. Step away from this wiki.
الاشتراك في:
الرسائل (Atom)